Before reading this article, please read the mentioned prerequisites so that you can have better idea for the implementation of solution which we are going to discuss here.
What is Dashboard design pattern?
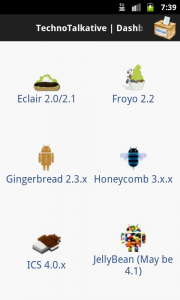
In brief, we can say Dashboard is a page containing large and clear symbols of main functionality and optionally an area for relevant new information.
1. UI Design Pattern – Dashboard (From Juhani Lehtimaki)
2. Android UI design patterns
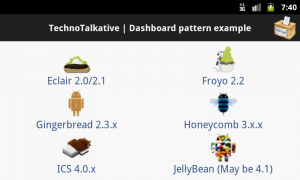
The main agenda of this article is to implement Dashboard design patter same as this image.
Step 1: Create Title bar layout
Yes we define title bar (header) layout only once but it requires in every screens. We will just show/hide home button and other buttons whenever needed. Once you are done with defining title bar layout, we can use the same layout in other layouts by using ViewStub.
Here is example of Title bar (header) xml layout:
header.xml
<?xml version="1.0" encoding="utf-8"?>
<RelativeLayout xmlns:android="http://schemas.android.com/apk/res/android"
    android:layout_width="fill_parent"
    android:layout_height="wrap_content"
    android:background="@color/title_background" >

    <LinearLayout
        android:id="@+id/panelIconLeft"
        android:layout_width="wrap_content"
        android:layout_height="wrap_content"
        android:layout_alignParentLeft="true"
        android:layout_centerVertical="true"
        android:layout_margin="5dp" >

        <Button
            android:id="@+id/btnHome"
            android:layout_width="wrap_content"
            android:layout_height="wrap_content"
            android:background="@drawable/ic_home"
            android:onClick="btnHomeClick" />
    </LinearLayout>

    <TextView
        android:id="@+id/txtHeading"
        style="@style/heading_text"
        android:layout_width="fill_parent"
        android:layout_height="wrap_content"
        android:layout_centerInParent="true"
        android:layout_marginLeft="5dp"
        android:layout_marginRight="5dp"
        android:layout_toLeftOf="@+id/panelIconRight"
        android:layout_toRightOf="@id/panelIconLeft"
        android:ellipsize="marquee"
        android:focusable="true"
        android:focusableInTouchMode="true"
        android:gravity="center"
        android:marqueeRepeatLimit="marquee_forever"
        android:singleLine="true"
        android:text=""
        android:textColor="@android:color/white" />

    <LinearLayout
        android:id="@+id/panelIconRight"
        android:layout_width="wrap_content"
        android:layout_height="wrap_content"
        android:layout_alignParentRight="true"
        android:layout_centerVertical="true"
        android:layout_margin="5dp" >

        <Button
            android:id="@+id/btnFeedback"
            android:layout_width="wrap_content"
            android:layout_height="wrap_content"
            android:background="@drawable/ic_feedback"
            android:onClick="btnFeedbackClick" />
    </LinearLayout>

</RelativeLayout>
In above layout code, i have referenced style from styles.xml and dimentions from dimen.xml:
styles.xml
<?xml version="1.0" encoding="utf-8"?>
<resources>
<style name="heading_text">
        <item name="android:textColor">#ff000000</item>
        <item name="android:textStyle">bold</item>
        <item name="android:textSize">16sp</item>
        <item name="android:padding">5dp</item>
    </style>
<style name="HomeButton">
        <item name="android:layout_gravity">center_vertical</item>
        <item name="android:layout_width">fill_parent</item>
        <item name="android:layout_height">wrap_content</item>
        <item name="android:layout_weight">1</item>
        <item name="android:gravity">center_horizontal</item>
        <item name="android:textSize">@dimen/text_size_medium</item>
        <item name="android:textStyle">normal</item>
        <item name="android:textColor">@color/foreground1</item>
        <item name="android:background">@null</item>
    </style>

</resources>
dimen.xml
<?xml version="1.0" encoding="utf-8"?>
<resources>
    <dimen name="title_height">45dip</dimen>
    <dimen name="text_size_small">14sp</dimen>
    <dimen name="text_size_medium">18sp</dimen>
    <dimen name="text_size_large">22sp</dimen>
</resources>
Step 2: Create super (abstract) class
Actually, In this abstract super class, we will define:
1) event handlers for both the buttons: Home and Feedback
2) other methods
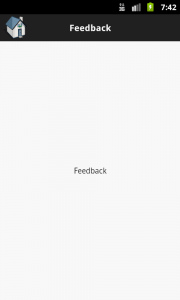
The Home and Feedback buttons, which are going to be visible in almost every activities and require the same actions to perform (i.e. take user to home activity), So instead of writing the same code in every activity, we write event handler only once in the abstract class which is going to be a super class for every activity.
You may have noticed in above header.xml layout: android:onClick=”btnHomeClick” (Home button) and android:onClick=”btnFeedbackClick” (Feedback button), so we will define this method only once in super class (abstract).
Please refer ViewStub example if you dont know about it.
Now, here is the code for Abstract (super) class, i call it as DashboardActivity.java
package com.technotalkative.viewstubdemo;

import android.app.Activity;
import android.content.Intent;
import android.os.Bundle;
import android.view.View;
import android.view.ViewStub;
import android.widget.Button;
import android.widget.TextView;

public abstract class DashBoardActivity extends Activity {
    /** Called when the activity is first created. */
    @Override
    public void onCreate(Bundle savedInstanceState) {
        super.onCreate(savedInstanceState);
    }

    public void setHeader(String title, boolean btnHomeVisible, boolean btnFeedbackVisible)
    {
      ViewStub stub = (ViewStub) findViewById(R.id.vsHeader);
      View inflated = stub.inflate();

      TextView txtTitle = (TextView) inflated.findViewById(R.id.txtHeading);
      txtTitle.setText(title);

      Button btnHome = (Button) inflated.findViewById(R.id.btnHome);
      if(!btnHomeVisible)
       btnHome.setVisibility(View.INVISIBLE);

      Button btnFeedback = (Button) inflated.findViewById(R.id.btnFeedback);
      if(!btnFeedbackVisible)
       btnFeedback.setVisibility(View.INVISIBLE);

    }

    /**
     * Home button click handler
     * @param v
     */
    public void btnHomeClick(View v)
    {
     Intent intent = new Intent(getApplicationContext(), HomeActivity.class);
     intent.setFlags (Intent.FLAG_ACTIVITY_CLEAR_TOP);
     startActivity(intent);

    }

    /**
     * Feedback button click handler
     * @param v
     */
    public void btnFeedbackClick(View v)
    {
     Intent intent = new Intent(getApplicationContext(), FeedbackActivity.class);
     startActivity(intent);
    }
}
Step 3: Define Dashboard layout
<?xml version="1.0" encoding="utf-8"?>
<LinearLayout xmlns:android="http://schemas.android.com/apk/res/android"
    android:layout_width="fill_parent"
    android:layout_height="fill_parent"
    android:orientation="vertical" >

    <ViewStub
        android:id="@+id/vsHeader"
        android:layout_width="fill_parent"
        android:layout_height="wrap_content"
        android:inflatedId="@+id/header"
        android:layout="@layout/header" />

    <LinearLayout
        android:layout_width="fill_parent"
        android:layout_height="wrap_content"
        android:layout_weight="1"
        android:orientation="vertical"
        android:padding="6dip" >

        <LinearLayout
            android:layout_width="fill_parent"
            android:layout_height="wrap_content"
            android:layout_weight="1"
            android:orientation="horizontal" >

            <Button
                android:id="@+id/main_btn_eclair"
                style="@style/HomeButton"
                android:drawableTop="@drawable/android_eclair_logo"
                android:onClick="onButtonClicker"
                android:text="@string/EclairActivityTitle" />

            <Button
                android:id="@+id/main_btn_froyo"
                style="@style/HomeButton"
                android:drawableTop="@drawable/android__logo_froyo"
                android:onClick="onButtonClicker"
                android:text="@string/FroyoActivityTitle" />
        </LinearLayout>

        <LinearLayout
            android:layout_width="fill_parent"
            android:layout_height="wrap_content"
            android:layout_weight="1"
            android:orientation="horizontal" >

            <Button
                android:id="@+id/main_btn_gingerbread"
                style="@style/HomeButton"
                android:drawableTop="@drawable/android_gingerbread_logo"
                android:onClick="onButtonClicker"
                android:text="@string/GingerbreadActivityTitle" />

            <Button
                android:id="@+id/main_btn_honeycomb"
                style="@style/HomeButton"
                android:drawableTop="@drawable/android_honeycomb_logo"
                android:onClick="onButtonClicker"
                android:text="@string/HoneycombActivityTitle" />
        </LinearLayout>

        <LinearLayout
            android:layout_width="fill_parent"
            android:layout_height="wrap_content"
            android:layout_weight="1"
            android:orientation="horizontal" >

            <Button
                android:id="@+id/main_btn_ics"
                style="@style/HomeButton"
                android:drawableTop="@drawable/android_ics_logo"
                android:onClick="onButtonClicker"
                android:text="@string/ICSActivityTitle" />

            <Button
                android:id="@+id/main_btn_jellybean"
                style="@style/HomeButton"
                android:drawableTop="@drawable/android_jellybean_logo"
                android:onClick="onButtonClicker"
                android:text="@string/JellyBeanActivityTitle" />
        </LinearLayout>
    </LinearLayout>
</LinearLayout>
Step 4: Define activity for handling this dashboard layout buttons click events.
In this activity, you will find the usage of setHeader() method to set the header for home activity, yes in this method i have passed “false” for home button because its already a home activity, but i have passed “true” for feedback button because feedback is needed to be visible. Other process are same as defining button click handlers.
<pre>package com.technotalkative.viewstubdemo;

import android.content.Intent;
import android.os.Bundle;
import android.view.View;

public class HomeActivity extends DashBoardActivity {
    /** Called when the activity is first created. */
    @Override
    public void onCreate(Bundle savedInstanceState) {
        super.onCreate(savedInstanceState);
        setContentView(R.layout.main);
        setHeader(getString(R.string.HomeActivityTitle), false, true);
    }

    /**
     * Button click handler on Main activity
     * @param v
     */
    public void onButtonClicker(View v)
    {
     Intent intent;

     switch (v.getId()) {
  case R.id.main_btn_eclair:
   intent = new Intent(this, Activity_Eclair.class);
   startActivity(intent);
   break;

  case R.id.main_btn_froyo:
   intent = new Intent(this, Activity_Froyo.class);
   startActivity(intent);
   break;

  case R.id.main_btn_gingerbread:
   intent = new Intent(this, Activity_Gingerbread.class);
   startActivity(intent);
   break;

  case R.id.main_btn_honeycomb:
   intent = new Intent(this, Activity_Honeycomb.class);
   startActivity(intent);
   break;

  case R.id.main_btn_ics:
   intent = new Intent(this, Activity_ICS.class);
   startActivity(intent);
   break;

  case R.id.main_btn_jellybean:
   intent = new Intent(this, Activity_JellyBean.class);
   startActivity(intent);
   break;
  default:
   break;
  }
    }
}
Step 5: Define other activities and their UI layouts
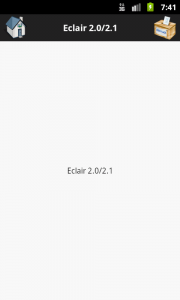
Now, its time to define activities that we want to display based on the particular button click from dashboard. So define every activities and their layouts. Don’t forget to call setHeader() method wherever necessary.
Here is one example for such activity – Activity_Eclair.java
package com.technotalkative.viewstubdemo;

import android.os.Bundle;

public class Activity_Eclair extends DashBoardActivity {
    /** Called when the activity is first created. */
    @Override
    public void onCreate(Bundle savedInstanceState) {
        super.onCreate(savedInstanceState);
        setContentView(R.layout.activity_eclair);
        setHeader(getString(R.string.EclairActivityTitle), true, true);
    }
}
activity_eclair.xml
<?xml version="1.0" encoding="utf-8"?>
<LinearLayout xmlns:android="http://schemas.android.com/apk/res/android"
    android:layout_width="fill_parent"
    android:layout_height="fill_parent"
    android:orientation="vertical" >

    <ViewStub
        android:id="@+id/vsHeader"
        android:layout_width="fill_parent"
        android:layout_height="wrap_content"
        android:inflatedId="@+id/header"
        android:layout="@layout/header" />

    <TextView
        android:id="@+id/textView1"
        android:layout_width="match_parent"
        android:layout_height="match_parent"
        android:gravity="center"
        android:text="@string/EclairActivityTitle" />

</LinearLayout>
Step 6: Declare activities inside the AnroidManifest.xml file
Now you are DONE ![]()
You can download source code from here: https://github.com/PareshMayani/Android-DashBoard-Example

