Welcome to the part 5 of Android wear application development series.
This series so far:
- Part 1: Android Wear: Installation and Setup, where we discussed about what is Android Wear and some of the usages, installed Android 4.4W SDK and look into creating Android Wear virtual device.
- Part 2: Android Wear: Hello World, where we wrote a Hello world program and run it successfully. We had also discussed about WatchViewStub and how it detects whether device is round or circle.
- Part 3: Set up wear emulator, where we talked about setting up wear emulator and pairing it with phone or tablet. We also saw some of the cards like hangout chat notification.
- Part 4: Simple notifications, where we talked about displaying wearable compatible notifications, which are actually get displayed as cards on wearable device
In this part
In this part, we are going to discuss about the new widget WearableListView which is an optimized listview for easy of use on smaller devices like android wear smart watches. We are also gonna explore key classes and interfaces of WearableListView class.
Let’s get started
Below are the key classes and interfaces of WearableListView class, about which we are going to talk about in this part.
| WearableListView |
| WearableListView.ViewHolder |
| WearableListView.Adapter |
| WearableListView.Item |
| WearableListView.ClickListener |
WearableListView
It’s an another ListView, available as WearableListView component which displays vertically scrollable items. It’s actually optimized ListView for easy of use on smaller devices like Android wearable watches. First optimization is it’s a child class of RecyclerView and strictly following ViewHolder pattern. Another specific point is focused item snaps to the center of the screen automatically when user stops scrolling. It displays 3 items at a time with focused item in the center of the screen.
public class WearableListView extends android.support.v7.widget.RecyclerView
          implements android.support.v7.widget.RecyclerView.OnScrollListener {

  ….
  ….
}
RecyclerView
RecyclerView is a secondary and an optimized ListView introduced in Material design. It’s optimized in a way it takes care of recycling views and manages scroll efficiently. If you want to read and explore more about the RecyclerView then have a look at A First Glance at Android’s RecyclerView by Wolfram Rittmeyer.
WearableListView.ViewHolder
ViewHolder is actually a holder of your exact set of views. It caches each of the views using tag field of the layout, so that we can access it immediately without doing findViewById() repeatedly. If you don’t implement it then there are chances of performance issue when user scrolls, but it really depends on the number of items and the number of views each item contains. Say for example, if you have a single TextView then you won’t be able to measure the performance issue easily but if you take ImageView and 3-4 other views then you would be able to notice the performance issue.
Reto Meier and Adam Powell had taken a session on The World Of ListView during Google I/O 2010. And even the entire Android team recommended for a long time to use ViewHolder pattern but surprisingly they never enforced to use of it, but now with the new Adapter pattern you finally have to use ViewHolder pattern. If you don’t about the ViewHolder pattern, have a look at this android training session on Making ListView scrolling smooth.
Over and all, ViewHolder is a common buzzword for an android developer because optimization for ListView or GridView can’t be achieved without implementing a ViewHolder pattern.
There is nothing changed in implementing this pattern. WearableListView.ViewHolder is actually a static class which extends RecyclerView.ViewHolder, have a look at the code of WearableListView.ViewHolder class.
 public static class ViewHolder extends android.support.v7.widget.RecyclerView.ViewHolder {
        public static final long DEFAULT_ANIMATION_DURATION = 150L;
        private static final java.lang.String TAG = "WearableListView";
        private android.animation.ObjectAnimator mScalingUpAnimator;
        private android.animation.ObjectAnimator mScalingDownAnimator;
        private float mMinValue;
        private float mMaxValue;

        public ViewHolder(android.view.View itemView) { /* compiled code */ }

        public void onCenterProximity(boolean isCentralItem, boolean animate) { /* compiled code */ }
    }
ViewHolder constructor gets View parameter as an argument using which you can always access root view of your ViewHolder by accessing public member itemView.
WearableListView.Adapter
Adapter is responsible for 2 things:
- Inflate correct layout for individual items.
- Display data into ListView
So it acts as a bridge between XML layout and data. WearableListView.Adapter actually extends the RecyclerView.Adapter class and it has some methods but as it’s an abstract class, we have to implement below 3 abstract methods:
public WearableListView.ViewHolder onCreateViewHolder(ViewGroup viewGroup, int i)
public void onBindViewHolder(WearableListView.ViewHolder viewHolder, int i)
public int getItemCount()
OnCreateViewHolder is called when ViewHolder is initiated for the first time. onBindViewHolder is called to get inner views and to set data into it. Here power of RecylerView.Adapter comes into the picture, it has actually provided us a top level of implementation so we don’t need to manually check whether current view is null, inflate layout and display data if it’s not null.
    public class MyListAdapter extends WearableListView.Adapter {

        @Override
        public WearableListView.ViewHolder onCreateViewHolder(ViewGroup viewGroup, int i) {
            return new WearableListView.ViewHolder(new MyItemView(MyActivity.this));
        }

        @Override
        public void onBindViewHolder(WearableListView.ViewHolder viewHolder, int i) {
            MyItemView itemView = (MyItemView) viewHolder.itemView;

            TextView txtView = (TextView) itemView.findViewById(R.id.text);
            txtView.setText(String.format("Item %d", i));

            Integer resourceId = listItems.get(i);
            CircledImageView imgView = (CircledImageView) itemView.findViewById(R.id.image);
            imgView.setImageResource(resourceId);
        }

        @Override
        public int getItemCount() {
            return listItems.size();
        }
    }
WearableListView.Item
This interface provides an ability to prepare item view, which we can used to initialize view holder inside onCreateViewHolder() method of adapter. It also allows us to prepare item layout and to implement scale animation based on the current proximity values. You can also set certain values based on the scaling up and down effects happen with WearableListView.
This interface has below methods:
   public static interface Item {
        float getProximityMinValue();

        float getProximityMaxValue();

        float getCurrentProximityValue();

        void setScalingAnimatorValue(float v);

        void onScaleUpStart();

        void onScaleDownStart();
    }
We will look at an implementation of this interface in demo example.
WearableListView.ClickListener
To implement item click listener for WearableListView, we have to implement WearableListView.ClickListener, which has 2 methods:
    public static interface ClickListener {
        void onClick(android.support.wearable.view.WearableListView.ViewHolder viewHolder);
        void onTopEmptyRegionClick();
    }
Clicking on particular item gives us an access of ViewHolder of that item and as I mentioned earlier about ViewHolder, we can access root view of ViewHolder by accessing public member itemView.
Note: Though sometimes it’s not required to implement click listener but still you have to implement it. The reason being is it gives NullPointerException if you haven’t implement it and if user clicks on empty region above items.
Simple example
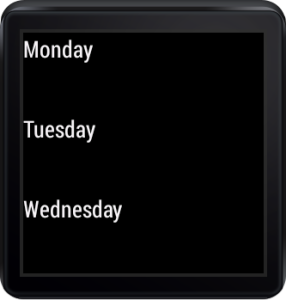
Let’s develop a simple example for days list, in which we will implement 3 concepts:
- WearableListView
- WearableListView.ClickListener
- WearableListView.Adapter
We will define custom adapter class by extending WearableListView.Adapter.
package com.technotalkative.wearablelistviewdemo;

import android.app.Activity;
import android.content.Context;
import android.os.Bundle;
import android.support.wearable.view.WatchViewStub;
import android.support.wearable.view.WearableListView;
import android.view.LayoutInflater;
import android.view.ViewGroup;
import android.widget.TextView;

import java.util.ArrayList;

public class SimpleListActivity extends Activity implements WearableListView.ClickListener{

    private WearableListView mListView;

    @Override
    protected void onCreate(Bundle savedInstanceState) {
        super.onCreate(savedInstanceState);
        setContentView(R.layout.activity_my);
        final WatchViewStub stub = (WatchViewStub) findViewById(R.id.watch_view_stub);
        stub.setOnLayoutInflatedListener(new WatchViewStub.OnLayoutInflatedListener() {
            @Override
            public void onLayoutInflated(WatchViewStub stub) {
                mListView = (WearableListView) stub.findViewById(R.id.listView1);
                mListView.setAdapter(new MyAdapter(SimpleListActivity.this));
                mListView.setClickListener(SimpleListActivity.this);
            }
        });
    }

    private static ArrayList<String> listItems;
    static {
        listItems = new ArrayList<String>();
        listItems.add("Monday");
        listItems.add("Tuesday");
        listItems.add("Wednesday");
        listItems.add("Thursday");
        listItems.add("Friday");
        listItems.add("Saturday");
    }

    @Override
    public void onClick(WearableListView.ViewHolder viewHolder) {

    }

    @Override
    public void onTopEmptyRegionClick() {

    }

    private class MyAdapter extends WearableListView.Adapter {
        private final LayoutInflater mInflater;

        private MyAdapter(Context context) {
            mInflater = LayoutInflater.from(context);
        }

        @Override
        public WearableListView.ViewHolder onCreateViewHolder(ViewGroup parent, int viewType) {
            return new WearableListView.ViewHolder(
                    mInflater.inflate(R.layout.row_simple_item_layout, null));
        }

        @Override
        public void onBindViewHolder(WearableListView.ViewHolder holder, int position) {
            TextView view = (TextView) holder.itemView.findViewById(R.id.textView);
            view.setText(listItems.get(position).toString());
            holder.itemView.setTag(position);
        }

        @Override
        public int getItemCount() {
            return listItems.size();
        }
    }
}
Advanced Example
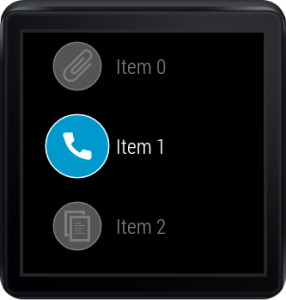
In advanced example, let’s develop a screen something similar to Start menu or Settings. Here we will define custom item view by implementing WearableListView.Item which would allow us to get and set proximity values, prepare and inflate item layout, set certain values for scale animations, etc.
Have a look at the custom item view class.
private final class MyItemView extends FrameLayout implements WearableListView.Item {

        final CircledImageView imgView;
        final TextView txtView;
        private float mScale;
        private final int mFadedCircleColor;
        private final int mChosenCircleColor;

        public MyItemView(Context context) {
            super(context);
            View.inflate(context, R.layout.row_advanced_item_layout, this);
            imgView = (CircledImageView) findViewById(R.id.image);
            txtView = (TextView) findViewById(R.id.text);
            mFadedCircleColor = getResources().getColor(android.R.color.darker_gray);
            mChosenCircleColor = getResources().getColor(android.R.color.holo_blue_dark);
        }

        @Override
        public float getProximityMinValue() {
            return mDefaultCircleRadius;
        }

        @Override
        public float getProximityMaxValue() {
            return mSelectedCircleRadius;
        }

        @Override
        public float getCurrentProximityValue() {
            return mScale;
        }

        @Override
        public void setScalingAnimatorValue(float value) {
            mScale = value;
            imgView.setCircleRadius(mScale);
            imgView.setCircleRadiusPressed(mScale);
        }

        @Override
        public void onScaleUpStart() {
            imgView.setAlpha(1f);
            txtView.setAlpha(1f);
            imgView.setCircleColor(mChosenCircleColor);
        }

        @Override
        public void onScaleDownStart() {
            imgView.setAlpha(0.5f);
            txtView.setAlpha(0.5f);
            imgView.setCircleColor(mFadedCircleColor);
        }
    }
Download
Download and explore both of these example: https://github.com/PareshMayani/WearableListViewDemo
Summary
This brings us to an end of this part. I feel today we talked more stuffs, of course it is because WearableListView and RecyclerView are such an amazing widgets. Today we talked about creating custom adapter class by extending WearableListView.adapter which has 3 abstract methods: 1) onCreateViewHolder 2) onBindViewHolder 3) getItemCount. We explored creating custom item view by implementing WearableListView.Item interface, which provides an ability to get and set proximity values, get and set scale animation values.
I am sure you liked this part of Android weable series, even I enjoyed writing this post for WearableListView which is actually undocumented at this time. Even I enjoyed implementing advanced listview which looks similar to list selection screens like start menu or settings. Please feel free to put thoughts if something should be improved in given description or code examples.