Welcome to the part 10 of the lazy android developers series. In earlier 9 parts, we discussed about UI libraries, dependency injection libraries, wireframe and mockup tools and at last reverse engineering of the android applications. There are couple of parts still left in this series and one of them is Android Testing and for the same, today we have Wiebe Elsinga and Ali Derbane from Itude Mobile and Dutch Android User Group. Yes this article is completely written by them (with love towards #AndroidDev community), as they are experts into the Android testing.
While writing this article, one great announcement is happened and that is, Wiebe is now a Google Developers Expert (Android), Congratulations Wiebe!
Today, Wiebe and Ali are going to talk about testing android applications and will explore testing tools and frameworks.
Some of the parts of this series:
- Part 6: We talked about Staggered GridView which is ultimately a GridView having multiple columns with rows of varying sizes.
- Part 7: We talked about Useful tools for the android application development like Postman, JSONViewer, TinyPNG and many others.
- Part 8: We talked about wireframe design, mockup/prototyping android application.
- Part 9: We talked about Reverse engineering android applications and tools can be used to perform reverse engineering.
Over to Wiebe and Ali!
Introduction
Testing is not a new technique during the development of Java software. Writing tests gives you a good understanding about the stability, quality and performance of an application or system. But what about testing when developing an Android application, is it also easy to achieve? There are different test types, like technical and functional tests, you may want to have your application tested. This article will show you different tools and frameworks you can use when developing your app. Showing you the basic details, usage and there pros and cons, so you can decide if it’s suitable for you to use.
Remark How to install the specific framework is not part of this article.
Technical testing
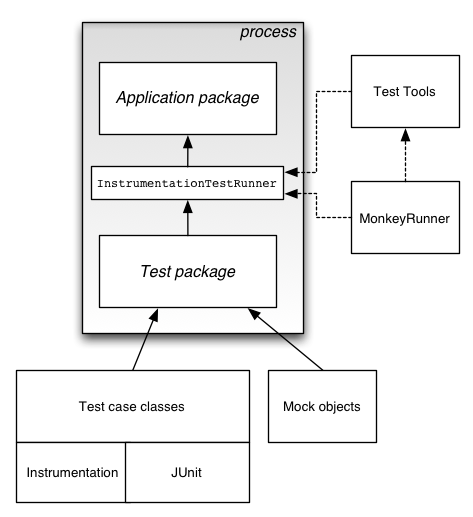
Unit testing, which means analyzing a block of code and test against a particular aspect, within the Android ecosystem is done by using JUnit and the instrumentation framework.
JUnit
Remark: All examples in this article will use a basic Calculator app to tests against. All tests will try to calculate 7 times 6 (as this is the answer of the ultimate question of Life, the universe and everything).
As all unit tests are based on JUnit, extend your Unit tests with junit.framework.TestCase. We want to test the “calculate function” of our main Activity, so setup a test scenario/step (starting with the word test) and get the Class to test.
Use Junit’s assertEquals to check whether calling the calculate function has the desired result.
public void testAGoodCalculation() {
MainActivity testClass = new MainActivity();
assertEquals(42, testClass.calculate("7×6"));
}
Now to run the test in Android studio, or using gradle command:
gradle connectedAndroidTest
Hamcrest
When you have checks that are somewhat more complex, than you might want to use Hamcrest. Hamcrest is a framework for writing matcher objects allowing ‘match’ rules to be defined declaratively.
So JUnit test check
assertTrue(foo.contains("someValue") && foo.contains("anotherValue"))
can be rewritten in Hamecrest to:
assertThat(foo, hasItems("someValue", "anotherValue"));
Other examples can be:
assertThat(yoda).isInstanceOf(Jedi.class);
assertThat(frodo.getName()).isEqualTo("Frodo");
assertThat(frodo).isNotEqualTo(sauron);
assertThat(frodo).isIn(fellowshipOfTheRing);
assertThat(sauron).isNotIn(fellowshipOfTheRing);
Functional testing
Testing your UX is also a test technique you may want to use. Testing the UX, especially within Test Driven Development (a.k.a. TDD) will give you a good insight in the way the application will behave. Also if you change/re-factor your application, using functional test gives you a mechanism to check if the UX is still behaving like it is supposed to do.
Remark: All frameworks are briefly described and more in-depth information will be available in future posts.
Robotium
The idea behind Robotium is that a functional test should description what the user sees and can do. This framework is a good choice if you are just “black box” testing your application. Besides extensive documentation, there are some well described examples available and the API is easy to use.
An example of how a Robotium test could look like:
mSolo.assertCurrentActivity("Started", MainActivity.class);
mSolo.clickOnText("7");
mSolo.clickOnText("×");
mSolo.clickOnText("6");
mSolo.clickOnText("=");
assertTrue(mSolo.waitForText("42"));
Calabash
Calabash is a functional testing framework that can be used for both iOS and Android functional testing. On paper it must be one of the easiest frameworks to use and even non-developers should be able to create functional tests using it. In a future blog post you will figure out why we find that this is not completely true.
To get you interested in the ease of Calabash though this is a little example of how a functional test could look like:
Feature: Hitchhiker's Guide

Scenario: Answer to the Ultimate Question of Life
the Universe and Everything

Given My app is running
When I press the "7" button
And I press the "×" button
And I press the "6" button
And I press the "=" button
Then I should see "42"
Espresso
Espresso has been introduced in 2013 by Google (Watch video: GTAC 2013: Espresso: Fresh Start to Android UI Testing). Since then it has been quite popular among Android developers and many presentations/talks have been given about this topic to help get you up to speed with this framework. In our opinion, it is one of our favourite frameworks to use and the great news is that for a couple of months now Espresso has been added to the Android Support Repository. To get you up and running with that take a look here: Espresso Set up & Instructions.
The principal behind Espresso is described in a JUnit way how information is handled in/with the view.
So an Espresso test will look like:
onView(withText(“7")).perform(click());
onView(withText("×")).perform(click());
onView(withText("6")).perform(click());
onView(withText("=")).perform(click());
onView(withId(R.id.resText)).check(matches(withText("42")));
Selendroid
Selendroid is a relatively new kid on the block and can be used to functionally test your Android applications. Apparently if you are used to Selenium, Selendroid should be an easy way to use your knowledge of it to create your functional tests for Android. This blog will appear as a guest blog post on TechnoTalkative.com. Since all of the readers know that Paresh likes to find ways to be a lazy developer (while being productive) but still being functional, I feel that Selendroid will be a very useful functional testing framework. One of the pleasant features of it is that you can use a visual editor (or as they call it “Selendroid Inspector”) to click through your application to create your test steps. Obviously you will still need to do some work yourself but even that is fun on Selendroid.
Below you will find an example of how a Selendroid test could look like:
mSDriver.findElement(By.linkText("7")).click();
mSDriver.findElement(By.linkText("x")).click();
mSDriver.findElement(By.linkText("6")).click();
mSDriver.findElement(By.linkText("=")).click();

WebElement resText = mSDriver.findElement(By.id(“resText"));
Assert.assertEquals(resText.getText(), "42");
Robolectric
Robolectric is a functional testing framework, that is in a way completely different to all previously described frameworks. It is different because tests that are run don’t run on either a device or emulator but they run on the JVM on your computer. I hear you wonder why this is good or bad. These questions will be answered in a future post but one spoiler will be given here and now. The tests run super fast so less waiting which gives you more time to do fun things!
This is an example of how a Robolectric test could look like:
mTestAct.findViewById(R.id.num_7).performClick();
mTestAct.findViewById(R.id.op_mul).performClick();
mTestAct.findViewById(R.id.num_6).performClick();
mTestAct.findViewById(R.id.op_equ).performClick();

EditText resultText = (EditText) mTestAct.findViewById(R.id.resText);
assertEquals("42", resultText.getText().toString());
In conclusion
Testing of Android applications is a must. Which test framework you want to use, depends on the what you want to do with it. To choose which one fits best, ask yourself who is going to make the tests, what needs to be tested and/or on which device the tests are running. In any case, there is enough choice to start writing functional tests.
As we’ve mentioned earlier there will be future blog posts that will dive into these frameworks.
Enjoy testing!
Authors

Wiebe Elsinga
Wiebe is an experienced Android Developer and Google Developer Expert for Android with a passion for UX, UI and innovation. Loves sharing his experience on designing and developing Android applications.

Ali Derbane
Started developing Android software in 2009 at a company called Itude Mobile. With a vibrant team of cool developers he has developed various applications for different industries like banking, pharmaceutical and logistics. While developing these apps lots of challenges arose. These challenges drive him to keep learning about the exciting world of Android. Blogging, hosting workshops and talking about the challenges and the solutions to these challenges gives him the opportunity to share his knowledge with the rest of the world. In the last years Ali has spoken at various events to share his knowledge.